Eldar Wraithknight Hex Mesh Airbrush Stencil Tutorial
Share
Step-by-Step Guide to Airbrushing the Eldar Wraithknight
Hey there, fellow Warhammer hobbyists! Are you ready to take your painting skills to the next level with an awe-inspiring Eldar Wraithknight? I've got just the project for you featuring our Hex Mesh Stencils from Fallout Hobbies. Check them out here, and let's dive into this fun and effective method!
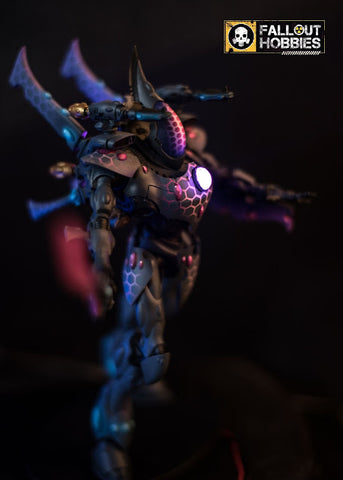
But first, check out the finished Eldar Wraithknight images that showcase intricate details, vibrant colors, and dynamic effects achieved through this step-by-step tutorial. Get ready to be inspired and see how a mix of skill, creativity, and the right tools can make your miniature into a breathtaking piece!


Now let's get started...
Step 1: Priming

Start by spraying all the main armor pieces with the Vallejo White Primer. This model is your canvas, so make sure it's smooth and ready for some color!
Step 2: The Warlord's Touch

Next, add that vibrant base layer using Vallejo Game Air Warlord Purple. This rich hue brings the Wraithknight to life!
Step 3: Highlights and Depth

For depth and dimension, spray a highlight on all the main armor pieces. Use a 50/50 mix of Vallejo Game Air Warlord Purple and white. It's all about those subtle details!
Step 4: Hex Mesh Magic

Now, the fun part! Lay down our Hex Mesh Stencil over the armor pieces and spray with Vallejo Game Air Sombre Grey. Watch the magic happen!
Step 5: Remove the Stencil

After removing the stencil, I blend in the edges with Sombre Grey. This step ensures the stencil work integrates flawlessly into the armor.
Step 6: Protect and Seal

Once all the paint is dry, seal your masterpiece with a coat of Matte Varnish. Protection is key!
Step 7: Spray The Helmet

For the helmet, use the smaller hex mesh pattern. Spray pure Vallejo Game Air Warlord Purple followed by Vallejo Game Air Hexed Lichen on the edges for that extra pop.
Step 8: Finishing Touches

After stencil removal, paint the edge with Sombre Grey to match the rest of the armor. Consistency is your friend.
Bringing It All Together
I used these techniques on various parts of the Wraithknight, including the shield, lower legs, and back spines. Just two nights of painting and voilà!
Although we don't carry it currently, this model also features Fallout Hobbies' Eldar Gemstone LED kit, adding a whole new level of coolness!
There you have it! With these steps, your Wraithknight will be the envy of the tabletop. Remember, it's not just about painting—it's about bringing your Warhammer 40K universe to life. Share your progress and final results with us—we can't wait to see your amazing work!


1 comment
I have been looking for something for my saim hann phantom titan for added interest, I like the idea, a little more subtle maybe…